New Principals for Long-Time Subscribers

If you are a new principal or administrator starting off at a school that has been with QuickSchools for a while you will want to check this out.

Learning how to navigate a Student Information System (SIS) that is already up and running may seem like a laborious task but no worries, we are here to help! Below are some tips on how to get yourself acquainted with QuickSchools and our different features.

Accessing QuickSchools for the First Time

In order to access QuickSchools an existing user with admin access will need to invite you to use the system and assign you to the “School Admin” role. Once you are invited you will receive an email with login instructions

Having School Admin access will give you full control of your schools QuickSchools account. School admin will have access to the subscription information and account information for your school. Some other things that only admin can do are:

Read More »

Activating a New Semester

In QuickSchools, academic terms are self-contained, meaning that when you edit/create subjects and enrollments in one semester, it does not affect other semesters within your account. Before activating a new term, we recommend checking out this article: Checklist when Transitioning to a New Term/Semester.

To activate the next term, go to New Semester Setup > View All Semesters > click Activate across the new term:


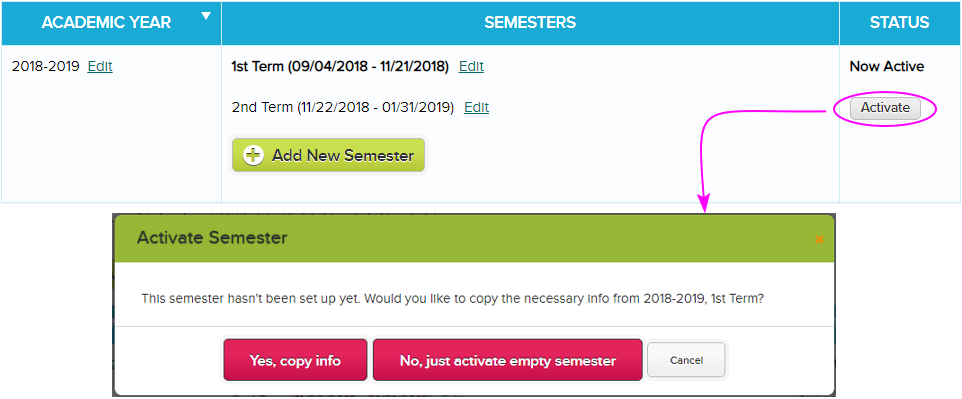
Activating the next term

Note: If you have not added the new term, click the Add New Semester button to create one.

In activating the next term, you’ll have the option to copy info from the active term or activate an empty semester:

Yes, copy info (Recommended) – the system copies all data from the active term into the new term. Subjects and enrollments are carried over – so you’re pretty much all set for the new semester. Note that some modules are reset so you’ll have a fresh semester to accommodate new data. This way data are separated by terms. Modules like Gradebook, Homework, Class Discussions, and Scheduling are blank when you start a new term.

No, just activate empty semester – you’ll get a new semester without subjects, grade levels, and homerooms. So all students won’t have assigned grade levels, no homeroom enrollments, and no subject enrollments. You’d have create the student grade levels and homerooms, then assign to students. You also need to create new subjects and enroll the students accordingly.

Once you have activated the new term, teachers can start doing the following on the fresh semester:

  • Take attendance
  • Enter grades in the Gradebook
  • Post homework, lesson plans, Class Discussions

Admins can also start creating report card for the newly activated semester (only if done with the previous semester’s report cards).

Important Notes:

  • In this article, the word TERM is also equivalent to SEMESTER and QUARTER. It simply refers to your grading periods within an academic year.
  • The instruction in this article shows how to activate a new term within the same academic year. If you need to activate a new academic year’s semester, check out our article – Creating New Academic Year.


QuickSchools Integration to Schoology

We’ve gotten a lot of traction in recent weeks with the QuickSchools integration to Schoology app that’s available on our App Store. We’ve actually had several improvements released over the previous Sprints D11 and D10. And we thought it was high time we also updated our online support documentation on it too. For latest documentation on the Integration to Schoology app, check out this link:

https://support.quickschools.com/hc/en-us/articles/360016713391-QuickSchools-Integration-to-Schoology

Just to highlight some key points:

  • If you already have student data in Schoology, you can map your students in QuickSchools with students in Schoology. Same thing goes for other elements like Teachers, Semesters and Subjects.
  • If you are new to Schoology, you can export all related data (i.e. students, teachers, semesters and subjects) from QuickSchools to Schoology. Data will be automatically mapped.
  • Once your core roster data are mapped, you can then synchronize the grades from your Schoology Gradebook into your QuickSchools Gradebook. The synchronization can be scheduled to run daily.
  • Once Gradebook data is transferred to QuickSchools, you can then use that data to generate Report Cards and Transcripts.
Schoology Integration App on QuickSchools App Store

We do integrate with other Learning Management Systems (LMS) other than Schoology. Some examples include Canvas (Beta), and Haiku (Beta). We are also looking into integrating with OdysseyWare as well. If you are interested in integration with any of these Learning Management Systems, or you have another LMS in mind, please feel free to reach out to our technical staff.

Configuring a Conduct Section in Report Cards

Report Card season is coming up fast. Have you configured your report cards in QuickSchools? For first timers, or schools looking to update their report card formats, here’s a tip on how you can add a Conduct (sometimes called “Behaviour”, “Citizenship” or “Character Development”) section to your report cards. This section is more typical of elementary/primary grade levels.

There are 2 main ways of setting up a conduct section, and they both have their own benefits and drawbacks:

  • Set up “Conduct” directly on the Report Card Template (Main method)
  • Set up “Conduct” as a Subject

Some key differences are discussed below:

“Conduct” directly on Report Cards “Conduct” as a Subject
Configuration

The Conduct criteria is configured ONCE directly into the Report Card configuration.

Configuration

You have to create a “Conduct” subject, and link it to the appropriate teacher and students.
You then need to create a “Subject-Specific Criteria” template for your Report Cards that contains your “Conduct” criteria.
Finally, the subject template will need to be applied to all “Conduct” subjects.
NOTE: From term to term, if new Conduct subjects are created, you’ll need to re-assign the subject template to that “Conduct” subject within the Report Card session.

Usage

Teachers need to use (and can only use) the main “Report Cards” menu to save evaluations for each student. This means that teachers have to open each individual student record card to enter evaluations

Usage

In addition to the main “Report Cards” menu, teachers can use the “Subject-Based” screen to submit evaluations for students, which is a lot simpler.

Restrictions / Limitations

Report Card Template must support Report Card Level Criteria. Most templates support this.

Restrictions / Limitations

Report Card Template must support the “Conduct” type Subject-Specific Criteria. Example template is “Contemporary Quarters

Other Drawbacks

None. This is the main method.

Other Drawbacks

Since Conduct appears as a subject, the Conduct subject will need to be hidden / ignored as appropriate from other modules like Transcripts or Master Scheduler

Report Cards Subject-Based Screen with criteria from the "Conduct" subject template
Report Cards Subject-Based Screen with criteria from the “Conduct” subject template
Entering Evaluations for Conduct in Report Cards

Here are links on how to set up the conduct sections:


Setting up a “Conduct” section in your Report Cards

In this article, we’ll be looking at how to configure your Report Cards in QuickSchools to contain a Conduct section (sometimes called “Behaviour”, “Citizenship” or “Character Development”) typical for elementary / primary school report cards. There are 2 available methods. This article discusses how to enter Conduct criteria directly into the Report Card template.

Related Articles:

There is alternate method to set up “Conduct” as a subject instead. This is discussed in a separate article. Please check out:

For a comparison between the two methods, please check out this article:

  • Configuring a Conduct Section in Report Cards

Setting up the Report Cards in this manner is pretty straight forward. Simply select a Report Card Template that supports Report-Level Criteria, and click on the “Customize RC Criteria” link on the far right. In this example, we’ll be using the “Quarterly Classic” template as an example:

Customize RC Criteria for Quarterly Classic

Once you click on it, you’ll be taken to the “Edit report card-level criteria” page:

Edit report card-level criteria (for Conduct section)

Use the available fields to add either a text field, a dropdown, a header, a comment, a likert or a likert header. The new fields should appear in the Conduct Section:Read More »

Setting up a “Conduct” section as Subjects

In this article, we’ll be looking at how to configure your Report Cards in QuickSchools to contain a Conduct section (sometimes called “Behaviour”, “Citizenship” or “Character Development”) typical for elementary / primary school report cards. There are 2 available methods. This article discusses how to use a “Conduct” subject to facilitate the Conduct section.

Related Articles:

There is alternate method to set up “Conduct” directly into the Report Card template. This is discussed in a separate article. Please check out:

  • Setting up a “Conduct” section in your Report Cards (Coming Soon)

For a comparison between the two methods, please check out this article:

  • Configuring a Conduct Section in Report Cards (Coming Soon)

The steps for setting up the Conduct section are summarized below. Please note that you will need to select a Report Card template that supports this feature. The template we are using for this article is the “Contemporary Quarters” template:

The "Contemporary Quarters" template support Conduct as Subjects
The “Contemporary Quarters” template support Conduct as Subjects

If you are interested in a particular template that does not support the Conduct section as subjects, please contact our technical support staff, and we can add support for it to the template.

Summary of Steps:

  • Create the “Conduct” subject, and enroll the appropriate students
  • Create the Subject-Specific Criteria for “Conduct”
  • Apply the “Conduct” subject template to the “Conduct” subjects
  • Testing the final configuration

Create the “Conduct” subject, and enroll the appropriate students

The step here is simple enough. Simply go to the “Subjects” menu to create subjects for the “Conduct” section. Be sure to name the subject appropriately, as the report card will display the subject name in the Conduct section (i.e. If you want the Conduct section to display as “Character Development”, name the subject as “Character Development”):

Setup Conduct Subjects and Name them Appropriately

Create the Subject-Specific Criteria for “Conduct”

Go to “Report Cards” > “Setup Subject-Specific Criteria”. If this sub-menu is not enabled, go to “Report Cards” > “Setup Report Cards”, and scroll to the bottom to enable the feature by clicking on the “Turn it On” link:Read More »

Importing Students and Teachers

Quickschools provides an efficient way to add student and teacher information in bulk — by importing information from an excel file. To do this you need to have your data accessible in an Excel file, one with either an “.xls” or “.xlsx” extension.

To initiate the import, simply click the Import button under Students/Teachers tab:


QuickSchools will automatically analyze your file and map commonly-named columns to the fields in QuickSchools. But you can override the mapping as you see fit:


Student Import mapping


Teacher Import mapping

You can also use this procedure to update student and teacher records. To update student records, your import file simply needs to contain the student names that match the student names in the system. During the import, when the system finds an existing record for a student on file, it updates the existing record instead of creating a new one. The same goes for updating teacher information via Import.

TIPS

  • When updating student records, the name in the file needs to be an EXACT match of the student name in the system (no extra spaces, case sensitive); Otherwise, Quickschools will create a new record for the student.
  • To avoid creating new student records instead of updating existing ones, we recommend including the Student Number/ID in the import file. In doing so, the system will match students based solely on the Student Number/ID. This will address situations where you may have multiple records with the same exact name.

You can get a sample of the import files below:


For more info on adding student and teacher information into Quickschools, please check out our Support articles below:

Adding Students To Quickschools

Adding Teachers To Quickschools


Let us know what you think, please chat with us!


New Super User App

To help school administrators manage user accounts for their schools, Quickschools launched a new Super User app. This was included in Sprint D12 release. The app can be installed from the Quickschools App Store.

As a Super User you will have access to the list of all users on your school – Teachers, Parents and Students. By clicking the ‘Login’ button beside the user’s name, the Super User will be able to log into the account, for purposes of debugging and verifying user access and privileges.

Please check out our support article for more information and let us know if you have comments or suggestions!