SSO via Google SAML

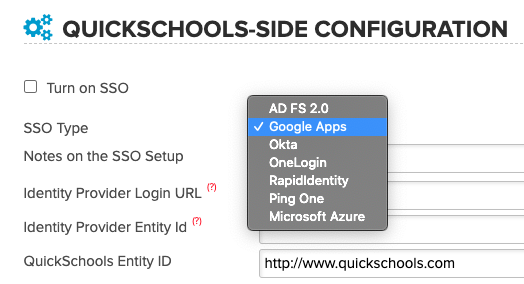
We recently announced that QuickSchools now provides Single Sign-On (SSO) functionality via the SAML protocol. This means that for schools on the Google ecosystem, you can use Google SAML as the Identity Provider (IDP), and have it manage users centrally.

QuickSchools Single Sign-On (SSO) via Google SAML

The SSO functionality is still in Private Beta, but schools can start using it at their own discretion. You will need to have the District (or Group) School feature enabled, in order to use this feature. We are looking for feedback to make the experience better. For more information on the new SSO functionality, you can check out this article:

https://blog.quickschools.com/2020/11/20/single-sign-on-sso-via-saml/

For Google SAML in particular, we’ve written up some quick notes on how to set it up (with screenshots and instructions). You can check it out on our support site here:

https://support.quickschools.com/hc/en-us/articles/360053886052

Please note that to set up Google SAML for your school, you will need a Google Workspace (formerly G Suite) account.

Let us know how it goes!

Online Forms: Electronic Signature

As most of you know, our Online Forms App allows you to add Fillable PDF Forms to your online form packet. To further allow your forms to go paperless, the online forms also allows users to add their electronic signature into the pdf form. This is useful for situations where you need a contract signed by the students as well as by the school.

Setting up Online Forms Signature

If you have not yet installed the Online Forms App in your QuickSchools account, you can do so via our App Store — search for Online Forms and click on Install

Once the app has been installed and configured, we would need to enable SVG for the online forms. This will allow Cross-Browser Compatibility and allow you to add digital signatures to the form. This is currently a hidden feature. To have this enabled please send us an email at support@quickschools.com

After SVG has been enabled for your account, we can now start setting up our Online Form Packet. Please note that when configuring the Online Form Packet, enable the One Form per Child option. This will allow parents to send a form per child, and allows any mapped information to be automatically filled (i.e. Student Data):

Read More »

Schedule Dropdown

For those who wish to print a Schedule that has not been activated yet, QuickSchools has a new dropdown in Private Beta that can be activated for your school. This feature is for the original (and simplified) Scheduling Module, and not for the new Master Scheduler that is currently also in Private Beta.

Here’s what the dropdown looks like from the “Schedule” tab (available for both Students and Teachers):

Screen Shot 2018-05-27 at 6.21.53 AM.png

Please contact support if you’d like this feature to be turned on for your Scheduling module.


BETA: Yearlong Attendance in Student Record

If you would like to have the Attendance tab in the student record show attendance data for the entire school year, this is now possible (in beta only) thanks to several requests we’ve received. You’ll need to contact us to set it up (you can just chat in or email us at support@quickschools.com), and we’ll be more than happy to enable this new capability.

Here’s a preview of what the attendance tab will look like using some dummy data:

Screen Shot 2015-12-16 at 9.57.46 AM.png

Caller ID for Voice Messaging

We have a new feature in Mass Parent Messaging (still in beta as of Aug 31, 2015), where you can now specify your own phone number for caller ID when sending out voice messaging. This process does require that you verify your phone number, but once verified, all calls that you make will have your specified phone number, and when parents call back, they will reach you directly. Here’s how you set it up:

Go to “Parent Messaging” > “Voice Message”, and click on the “Change” link if you’d like to change the caller ID from what has been currently set:

Set Caller ID for Voice Messaging

Then on the pop-up dialog box, specify the number you’d like to use:Read More »